Baselines!
While in the tower at the Cecil County NSCA race, I was talking with Ned Erkman from Rolling Thunderz. He suggested I write an article about baselines, or starting points beginner and intermediate racers could refer to if they wander too far off course and need a map back. This is by no means a definitive article about how every car should be run; that would be impossible. It's made up of ideas the staff at ProCar had; your experiences may yield a different solution, so feel free to experiment.
Being that ProCar is in the chassis business first and the engine business second, it stands to reason we'd have plenty to say about shock/spring/ladder bar and four-link tuning. Racers have a fascination with their engines; numerous test sessions are spent dialing in carburetor jetting, timing curves and shift points. Equal time spent on the chassis can often yield even greater results. Ladder bar/four link angle, spring rate and shock tweaking can pay off in a faster and more consistent race car- making the platform stable enough to do its job and react to tuning input as you move back in front of the firewall and dial in for power.
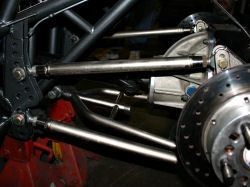
When a racer chooses a ladder bar suspension, whether by rule or by choice, they receive a predictable platform that doesn't require much ‘black magic' to get down the racetrack. Unlike the literally hundreds of tuning choices available to the four-link owner, they have a straightforward package that should perform well within a fairly narrow window of adjustments. When working with a set of ladder bars, it is important to remember that the suspension will deliver a bunch of anti-squat (what you see when the rim heads into the sidewall at the launch) and not a ton of load as the car drives out. Lowering the front pick-up point of the ladder bar will increase the load applied down track while reducing the amount of ‘hit' (anti squat) sent to the tire. When measured on a flat surface, the ladder bars usually run well with about 2.5 degrees of rake on the bottom bar when compared to the ground, low front to high rear. Often, we'll see bars that angle up or not at all. One needs to remember that the amount of hit goes up as the front of the bar rises, and load carried goes down. Balance is critical, as we need to keep the tire hooked as the car moves off the line. If we lower the front of the ladder bars too much, the car will spin at the release of the trans brake, as the power delivered overcomes the anti squat available.
 Four links require a bit more
finesse to get the ET's down. Because the top and bottom bar are independent of
each other, there are many ways to shape the theoretical intersect point or
‘instant center' (IC). The shape the bars take is as important as the IC
location itself, as you can juggle them several different ways and plot similar
points- angularity and height contribute greatly to hook and driveability. Our
experience has taught us that most SS, TS, PO or even n/a EZ street cars want a
lower bar that runs fairly parallel to the ground, as low as 6.5” for the
lower powered car (actually lower power/weight ratio) to as high as 7.5”
for the Pro Outlaw beast. Power and center of gravity make the final
determination, but most of the faster entries want a maximum of 3/8” rake
in the bottom bar. Otherwise, the housing will push the quarters down at the
launch and wad the tire. (Lots of rake causes too much ‘bite', or down
track loading.) We usually stick with 3/16” and go from there- some cars
run flatter bars, some more angular. IC length is fairly straightforward; and
controlled with the top bar. Starting at a height of 4” (from axle c/l)
or less at the rear (housing side) of the top bar, we take into account the
wheelbase and weight percentage when choosing the front or upper chassis hole.
This is how we arrive at a workable IC length. If setting up an 8 second or
quicker car for the first time, start with a roughly flat bottom bar, top bar
at 4” or less away from the housing, then angle the front as required to
reach optimum IC length. The slower the car, the more angular bottom bar the
car will tolerate. On cars going 9's or slower, the top bar can be spread as
wide as 4 5/8 from axle c/l, and the bottom bar can rake as much as a half
inch. The reasoning is simple- the more torque the car has; the more it can
load the tire without the suspension's help. As power decreases, the car needs
to apply the tire using mechanical leverage, using longer IC's with more spread
between the bars.
Four links require a bit more
finesse to get the ET's down. Because the top and bottom bar are independent of
each other, there are many ways to shape the theoretical intersect point or
‘instant center' (IC). The shape the bars take is as important as the IC
location itself, as you can juggle them several different ways and plot similar
points- angularity and height contribute greatly to hook and driveability. Our
experience has taught us that most SS, TS, PO or even n/a EZ street cars want a
lower bar that runs fairly parallel to the ground, as low as 6.5” for the
lower powered car (actually lower power/weight ratio) to as high as 7.5”
for the Pro Outlaw beast. Power and center of gravity make the final
determination, but most of the faster entries want a maximum of 3/8” rake
in the bottom bar. Otherwise, the housing will push the quarters down at the
launch and wad the tire. (Lots of rake causes too much ‘bite', or down
track loading.) We usually stick with 3/16” and go from there- some cars
run flatter bars, some more angular. IC length is fairly straightforward; and
controlled with the top bar. Starting at a height of 4” (from axle c/l)
or less at the rear (housing side) of the top bar, we take into account the
wheelbase and weight percentage when choosing the front or upper chassis hole.
This is how we arrive at a workable IC length. If setting up an 8 second or
quicker car for the first time, start with a roughly flat bottom bar, top bar
at 4” or less away from the housing, then angle the front as required to
reach optimum IC length. The slower the car, the more angular bottom bar the
car will tolerate. On cars going 9's or slower, the top bar can be spread as
wide as 4 5/8 from axle c/l, and the bottom bar can rake as much as a half
inch. The reasoning is simple- the more torque the car has; the more it can
load the tire without the suspension's help. As power decreases, the car needs
to apply the tire using mechanical leverage, using longer IC's with more spread
between the bars.
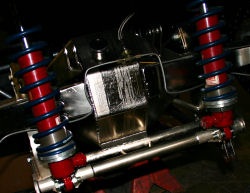 Springs and
shocks are easily the most critical tuning aid we have at our disposal. Koni's
generally start at 4 sweeps from tight on rebound (extension) and 5 clicks from
loose on bump (compression). Santuffs start about 4 sweeps from tight and on
rebound and six clicks from tight on the bump. Strange shocks respond to a
similar setting as the Koni's; ¾ tight on rebound and about half tight
on bump, depending on the model you have and the number of adjustments
available. These are obviously baselines, and only trial and error produces the
best results. No shock should be completely locked up or dead loose- if that is
the case call the manufacturer to discuss a custom valving package. The tighter
the rebound is set, the shorter an IC the car will tolerate. Longer IC's often
require a softer rebound and stiffer bump as the increased leverage on the
chassis leads to more squat. Shorter IC's with a flatter bottom bar will try to
separate the chassis at launch, requiring greater clamping from the shocks to
control the housing's movement.
Springs and
shocks are easily the most critical tuning aid we have at our disposal. Koni's
generally start at 4 sweeps from tight on rebound (extension) and 5 clicks from
loose on bump (compression). Santuffs start about 4 sweeps from tight and on
rebound and six clicks from tight on the bump. Strange shocks respond to a
similar setting as the Koni's; ¾ tight on rebound and about half tight
on bump, depending on the model you have and the number of adjustments
available. These are obviously baselines, and only trial and error produces the
best results. No shock should be completely locked up or dead loose- if that is
the case call the manufacturer to discuss a custom valving package. The tighter
the rebound is set, the shorter an IC the car will tolerate. Longer IC's often
require a softer rebound and stiffer bump as the increased leverage on the
chassis leads to more squat. Shorter IC's with a flatter bottom bar will try to
separate the chassis at launch, requiring greater clamping from the shocks to
control the housing's movement.
 There are several schools
of thought pertaining to spring selection. The easiest and least scientific way
we've found to choose spring rate is to select the heaviest spring that doesn't
come loose when the rear is dangling on jack stands. Most 3000 lb backhalf cars
work well with a 130 lb rear spring. Our 2500 lb Vette uses a 100. The goal is
to purchase a high quality shock that will control the housing at launch,
without resorting to a heavy spring to stabilize the rear. A slightly more
pliant spring will go over bumps and irregularities better, with the shock
doing the work to keep the assembly stiff at the hit.As racers begin to play
with power adders, (especially nitrous) they are often at a loss where to
start. In the case of nitrous, it is critical to establish where the motor
wants to be naturally aspirated. Knowing your engine's best timing and
carburetion curves before you engage the spray will make for a quicker learning
curve than just setting timing at an arbitrary number and guessing at the
amount of retard required. We start off with the most efficient timing curve
that yields the highest mph on motor, subtracting 3 degrees for every hundred
horsepower of nitrous added (plus two for safety). If you're patient,
‘learning' the system's idiosyncrasies at lower power levels can prepare
you for the bigger jets. Lighter nitrous loads are also more tolerant of richer
mixtures; tune-ups in excess of 300 hp (advertised) are not. As the area of the
nitrous pills grows, it will burn an increasingly larger amount of fuel- even
if you are too rich. Think of an oxy-acetylene torch with the acetylene turned
up too high- it still burns, but the flame is uncontrollable. The oxygen (or
nitrous in this example) trims the flame kernel, tightening it up. With a
leaner mixture and a little extra timing retard you may not make as much power,
but you reduce the possibility of leaving un-burnt fuel in the ring lands and
distorting the piston. Still, nothing replaces experimenting with the smaller
pills in the kit and trying different mixtures. This gives you a feel for how
the kit ‘works', and the smaller shot will protect you from yourself as
you learn the kit.
There are several schools
of thought pertaining to spring selection. The easiest and least scientific way
we've found to choose spring rate is to select the heaviest spring that doesn't
come loose when the rear is dangling on jack stands. Most 3000 lb backhalf cars
work well with a 130 lb rear spring. Our 2500 lb Vette uses a 100. The goal is
to purchase a high quality shock that will control the housing at launch,
without resorting to a heavy spring to stabilize the rear. A slightly more
pliant spring will go over bumps and irregularities better, with the shock
doing the work to keep the assembly stiff at the hit.As racers begin to play
with power adders, (especially nitrous) they are often at a loss where to
start. In the case of nitrous, it is critical to establish where the motor
wants to be naturally aspirated. Knowing your engine's best timing and
carburetion curves before you engage the spray will make for a quicker learning
curve than just setting timing at an arbitrary number and guessing at the
amount of retard required. We start off with the most efficient timing curve
that yields the highest mph on motor, subtracting 3 degrees for every hundred
horsepower of nitrous added (plus two for safety). If you're patient,
‘learning' the system's idiosyncrasies at lower power levels can prepare
you for the bigger jets. Lighter nitrous loads are also more tolerant of richer
mixtures; tune-ups in excess of 300 hp (advertised) are not. As the area of the
nitrous pills grows, it will burn an increasingly larger amount of fuel- even
if you are too rich. Think of an oxy-acetylene torch with the acetylene turned
up too high- it still burns, but the flame is uncontrollable. The oxygen (or
nitrous in this example) trims the flame kernel, tightening it up. With a
leaner mixture and a little extra timing retard you may not make as much power,
but you reduce the possibility of leaving un-burnt fuel in the ring lands and
distorting the piston. Still, nothing replaces experimenting with the smaller
pills in the kit and trying different mixtures. This gives you a feel for how
the kit ‘works', and the smaller shot will protect you from yourself as
you learn the kit.