4 Link System - Step by Step

Suspension Tuning, Troubleshooting, Design and Discussion

Moderators: David Lemmond, Dave Morgan

Message
Author
User avatar
Mike Peters
Posts: 930
Joined: Wed Oct 12, 2005 1:48 pm
Location: Wichita, KS

Re: 4 Link System - Step by Step

#196 Post by Mike Peters » Thu Jun 03, 2010 10:58 am

BillyShope wrote:Similarly, ring and pinion forces need not be considered.
Disagree. How can you discount a force acting upon the car except when it's conveniently disregarded for argumentative purposes?
BillyShope wrote:The rear axle assembly can then be considered as merely a giant link, with pivots at the tire patch and at the front pivot. A moment cannot be generated at either of these two points, so the line of action of any force acting at one of the two pivots must pass through the other pivot.
The rear end housing is not "merely" a giant link. It is a unit used for the transference of power and therefore has dynamics acting through it and therefore transferring those forces through which it is attached. You know, that pesky Newton's Law of Physics thing? Once again, you have disregarded bar angles and spreads. For all the effort you put into your webpage, I don't know why this basic aspect is ignored.
BillyShope wrote:But, this has been a ladder bar car and not a 4link. The instant center of a 4link, however, acts in exactly the same manner as the pivot of a ladder bar car.
Wow, with that statement you just blew the minds of thousands of chassis builders and racers. A ladder bar and 4-link I/C DO NOT act the same. If this is your belief, we will not reach any middle ground. A ladder bar has different force vectors than a 4-link since it is one unitized structure whereas the 4-link is obviously not. Ladder bar cars would be much easier and cheaper to build but, rarely are these days. Why is that? Rhetorical question...........
BillyShope wrote: The body under consideration has no "idea" of 4link spread, bottom link angle, or anything other than the force it "feels" acting at the instant center.
I'm almost speechless if you think the only force enacted on the car is the through the I/C. The rear end housing wants to rotate in the opposite direction of the tires and therefore transmits that force through the suspension links. If you choose to discount the different leverage forces created by the possible different attachment points, I'm at a loss for words. Billy, would you agree that the desire of the rear end housing to rotate pulls on the upper suspension links and therefore pushes on the lower suspension links? If you can agree with that, surely you must consider the leverage ratios of bar spreads and bar angles acting upon the chassis attachment points.
BillyShope wrote:Remember that a force can be moved anywhere along its line of action. You can balance a pencil on your finger or you can tie a string around its balance point and suspend it. Same force and same result. Only the point of application has been changed.
I was never describing the "suspension" of a pencil, I was describing the force acting through a suspension link and using the simple example of pushing a pencil and how it reacts to the force moving it.
BillyShope wrote:Similarly, that force acting at the instant center can be moved anywhere along its line of action. Remember, now, that "line of action" is the same as a line of constant percent antisquat.
Once again, angles of force vectors are being discounted. I just don't know how you can disregard the laws of physics.
BillyShope wrote:It follows, then, that the percent antisquat is the defining factor in the determination of a car's dynamic performance during launch.
Nope. It is ONE factor of many that define the dynamics acting upon the car's ability to launch. Let's find that 3000 HP Pro Mod car that has the I/C on 100% anti-squat (doubt we find one but....) and make a pass. Then, let's stiffen the springs up so the ride height remains the same and throw 100# in the rear and make another pass. Since the I/C didn't change, the results of the launch should be the same, correct?
BillyShope wrote:Roll steer effects occur when, as a result of chassis roll, the entire rear axle assembly rotates in plan view, causing a steering effect akin to the push karts you might have built as a boy. Anecdotal consequences, such as have been supplied, emphasize the importance of the elimination of that chassis roll which occurs as a result of driveshaft torque. An ARB helps, but complete elimination of chassis roll can only be achieved with some form of suspension asymmetry which cancels the driveshaft torque effect.
Guess our definitions of "roll steer" aren't the same. You're talking chassis roll or "roll rotation" and I'm using it as the common used term to describe the thrust of the rear end housing acting upon the chassis points which induces non-driver forces to steer the car.

Billy, I respect your accomplishments and your history. I'm sure you've got some great tales to tell. You're indeed a man who has ascertained a large amount of knowledge and are willing to share what you believe is correct. I am ready to stop my contributions to this on-line debate since you continue to discount the basic findings of many other well-respected "experts" of this subject. Are all of my points of discussion my own findings? Hell no they aren't. I read what I can on the subject and discuss with others to sort through what really applies and disregard what doesn't. Your context disputes many who are considered "experts" in this subject area who have had much success. I am not totally discounting your asymmetrical 4-link setting under the right application but, to continually state bar angles and spreads aren't a factor when they indeed are, will not buy you much time at the microphone.
"If winning was easy, losers would be doing it"

bracketracer
Posts: 329
Joined: Wed Oct 29, 2008 7:14 pm
Location: New Jersey

Re: 4 Link System - Step by Step

#197 Post by bracketracer » Thu Jun 03, 2010 12:34 pm

Mike looked for the "Ramchargers" and look what came up....Funny but a Jr dragster is going faster right now :scratch: ...
http://www.motorsportsvillage.com/billyshope/index.html

User avatar
Mike Peters
Posts: 930
Joined: Wed Oct 12, 2005 1:48 pm
Location: Wichita, KS

Re: 4 Link System - Step by Step

#198 Post by Mike Peters » Thu Jun 03, 2010 12:53 pm

bracketracer wrote:Mike looked for the "Ramchargers" and look what came up....Funny but a Jr dragster is going faster right now :scratch: ...
http://www.motorsportsvillage.com/billyshope/index.html
Yep, they were fighting an uphill battle back then. Obviously, technology and knowledge base have changed quite a bit since that era.
"If winning was easy, losers would be doing it"

User avatar
Jeff 4100
Posts: 184
Joined: Tue Jun 16, 2009 8:34 pm
Location: Brazil

Re: 4 Link System - Step by Step

#199 Post by Jeff 4100 » Sat Jun 05, 2010 10:29 am

bracketracer wrote: Also I have never seen the lower bars going up in the front....Never.....
Mr. BracketRacer,
Lets see If I understood you...sorry...
When you say it about the lower bar position, Is it like showed in the picture??
Just to confirm...for the lower bar, is the rear pivot higher than the front pivot?
Attachments
Negative angle
Negative angle
_______________________________
Jeff Weiss
W2 Racing Chassis
Brazil
Facebook: https://pt-br.facebook.com/w2racing
http://www.w2racingchassis.com.br
jeff.automotive@hotmail.com

User avatar
Jeff 4100
Posts: 184
Joined: Tue Jun 16, 2009 8:34 pm
Location: Brazil

Re: 4 Link System - Step by Step

#200 Post by Jeff 4100 » Sat Jun 05, 2010 10:34 am

Mike Peters wrote:The rear end housing is not "merely" a giant link. It is a unit used for the transference of power and therefore has dynamics acting through it and therefore transferring those forces through which it is attached.
And a lot of is said about the pinion angle and its influences...it is another hidden thing inside the "giant link"...
_______________________________
Jeff Weiss
W2 Racing Chassis
Brazil
Facebook: https://pt-br.facebook.com/w2racing
http://www.w2racingchassis.com.br
jeff.automotive@hotmail.com

User avatar
Jeff 4100
Posts: 184
Joined: Tue Jun 16, 2009 8:34 pm
Location: Brazil

Re: 4 Link System - Step by Step

#201 Post by Jeff 4100 » Sat Jun 05, 2010 11:02 am

Mike Peters wrote: Yep, they were fighting an uphill battle back then. Obviously, technology and knowledge base have changed quite a bit since that era.
Mike,
Look my job that I finished this week.
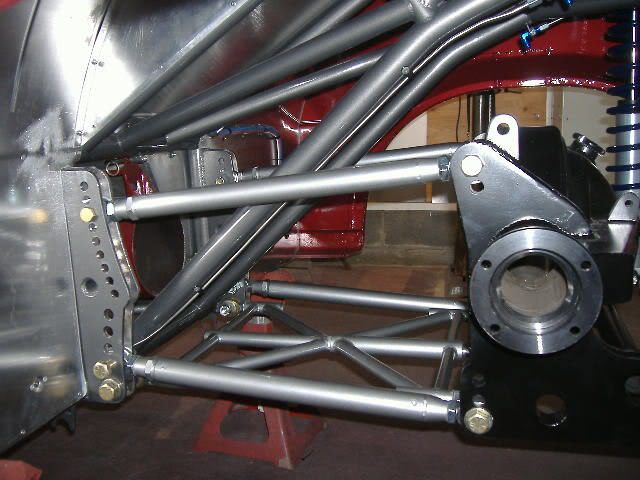
The new 4 link assembled over the bench...It will be installed on a friend's car...to preserve the floor, the upper bars are shorten almost 4".

And after I'll see the roll cage that I projected and built to my car...just to show you...I projected my own Tube Bender and Notcher Machines (is too expensive to buy one...we have not a specific machine here in Brazil...). I think the final result is good and the new machines worked well...the tubes are just fixed, not welded yet...
Last edited by Jeff 4100 on Tue Aug 03, 2010 9:39 pm, edited 3 times in total.
_______________________________
Jeff Weiss
W2 Racing Chassis
Brazil
Facebook: https://pt-br.facebook.com/w2racing
http://www.w2racingchassis.com.br
jeff.automotive@hotmail.com

bracketracer
Posts: 329
Joined: Wed Oct 29, 2008 7:14 pm
Location: New Jersey

Re: 4 Link System - Step by Step

#202 Post by bracketracer » Sat Jun 05, 2010 7:44 pm

Jeff 4100 wrote:
bracketracer wrote: Also I have never seen the lower bars going up in the front....Never.....
Mr. BracketRacer,
Lets see If I understood you...sorry...
When you say it about the lower bar position, Is it like showed in the picture??
Just to confirm...for the lower bar, is the rear pivot higher than the front pivot?


That's correct ...and don't be sorry....Also moving the rear pivot point closer to the axle c/l will also change your action...

Mike is a smart guy and always like to read his reply's as there is always some good info...And since you brought this up here is an article that Mike posted some time back and don't know if you seen it but some very good reading..
http://www.dragzine.com/tech-stories/dr ... ving-hook/
Billy is a smart guy also but I really take his thinking with a grain of salt..His theory on some things just is not so and if it was everyone would be doing it..

bracketracer
Posts: 329
Joined: Wed Oct 29, 2008 7:14 pm
Location: New Jersey

Re: 4 Link System - Step by Step

#203 Post by bracketracer » Sat Jun 05, 2010 7:49 pm

Mike,
Look my job that I finished this week.
The new 4 link assembled over the bench...It will be installed on a friend's car...to preserve the floor, the upper bars are shorten almost 4".
DSC01457 [1280x768].JPG


Very nice work Jeff!!!!! I had a Vega that had shorter top bars. It was a little difficult to get it to work as I was told that it will have bind as a same length bar won't....After some tinkering I had an anti-roll bar installed and all was better and worked better than ever and left straight and almost even....
Image

User avatar
Jeff 4100
Posts: 184
Joined: Tue Jun 16, 2009 8:34 pm
Location: Brazil

Re: 4 Link System - Step by Step

#204 Post by Jeff 4100 » Sat Jun 05, 2010 8:41 pm

bracketracer wrote: Mike is a smart guy and always like to read his reply's as there is always some good info
I do not have words to thanks my friend Mike!!! He has helped me since the beginning of this topic.
I got very good results here because his advices...
I saved this article to read it on my breakfast tomorrow...If it is writen by Dave, I need to be 100% concentrated to understand his knowledgement...
I have my Doorslammer specially autographed by him...he helped me a lot to join me to the Yellow Dot's Society!!! Because him, I'm here to learn with you!!!

Thanks again!!
_______________________________
Jeff Weiss
W2 Racing Chassis
Brazil
Facebook: https://pt-br.facebook.com/w2racing
http://www.w2racingchassis.com.br
jeff.automotive@hotmail.com

User avatar
Jeff 4100
Posts: 184
Joined: Tue Jun 16, 2009 8:34 pm
Location: Brazil

Re: 4 Link System - Step by Step

#205 Post by Jeff 4100 » Sat Jun 05, 2010 8:51 pm

bracketracer wrote:Very nice work Jeff!!!!! I had a Vega that had shorter top bars. It was a little difficult to get it to work as I was told that it will have bind as a same length bar won't....After some tinkering I had an anti-roll bar installed and all was better and worked better than ever and left straight and almost even....
Good tip!!!
Maybe it will be a good solution when I'll run on the class that allows the Hoosier Drag Dot Radial 235/50R15 tires.

Install the ARB and to move up the rear pivot of the lower bars...I think so.
My upper bars already have more than 9°...I'll keep its position.

:thumb:
_______________________________
Jeff Weiss
W2 Racing Chassis
Brazil
Facebook: https://pt-br.facebook.com/w2racing
http://www.w2racingchassis.com.br
jeff.automotive@hotmail.com

User avatar
Jeff 4100
Posts: 184
Joined: Tue Jun 16, 2009 8:34 pm
Location: Brazil

Re: 4 Link System - Step by Step

#206 Post by Jeff 4100 » Sat Jun 05, 2010 9:05 pm

Mike Peters wrote:my suggestion is to go out and run the car, analyze the run, and see what the car wants. If you want more anti-squat, make the adjustment and make another pass.
Mike,
Your words together with the Mr. Bracketracer experiences gave me the first decision to test on that new 4 link.
I'll move up the rear pivot of the lower bar, reduce the IC for the almost 55...60% (against the 85% of my car).and beyond it, to test the new AFCO shocks that I'm negociating with Mr. Eric Saffel...I'll purchase a pair of 80-20 non-adjustable front shocks and pair of Reactor Gas Series Single Adjustable Shocks for the rear...

It'll give me a lot of new conclusions about this new 4 Link of the my friend's car in comparison of of my car that ran the last season...

Now, the question is: How about the assimetrical bars spread for my case?

Thanks,
_______________________________
Jeff Weiss
W2 Racing Chassis
Brazil
Facebook: https://pt-br.facebook.com/w2racing
http://www.w2racingchassis.com.br
jeff.automotive@hotmail.com

bracketracer
Posts: 329
Joined: Wed Oct 29, 2008 7:14 pm
Location: New Jersey

Re: 4 Link System - Step by Step

#207 Post by bracketracer » Sun Jun 06, 2010 8:07 am

Jeff, I see your using a diagonal link,,,,Ever think of using a wishbone??? The wishbone will allow more movement of the rear and will cause body roll...Mike can give you a better understanding of this..Just to let you know I have a hard time explaining things on paper so with that being said :scratch: ....Here is the link that was installed in my car. Now they call it an X-link it attaches at all 4 corners of the 4link and pivots in the middle..It also has a anti-roll....One thing I like about it as there is no bind and has no side to side movement...
Image

User avatar
Jeff 4100
Posts: 184
Joined: Tue Jun 16, 2009 8:34 pm
Location: Brazil

Re: 4 Link System - Step by Step

#208 Post by Jeff 4100 » Sun Jun 06, 2010 9:55 am

bracketracer wrote:The wishbone will allow more movement of the rear and will cause body roll.Here is the link that was installed in my car. Now they call it an X-link it attaches at all 4 corners of the 4link and pivots in the middle..It also has a anti-roll....One thing I like about it as there is no bind and has no side to side movement...
Yeah!It's a good thing to do...I just made the diagonal bar because its easier to build...not about its real performance...
I think now is the time!! But, its thing to test after the lower bars spread, shocks, ARB...I dont wanne be lost between all of these improvements...

Dave said about it on the Doorslammer, page 123.: "A wishbone when installed properly, allows the housing to roll rotate within the car. This allows you to make better use of shocks for chassis tuning, provides more driveshaft clearance and makes better use of any intended pre-load that gets placed within the chassis."

I think the "Y" format could be fine on my car...Beyond it to be lighter than the X-link, my car does not have any torque values near than yours.

Thanks!!!!
Attachments
wishbone1.jpg
wishbone1.jpg (40.94 KiB) Viewed 9909 times
_______________________________
Jeff Weiss
W2 Racing Chassis
Brazil
Facebook: https://pt-br.facebook.com/w2racing
http://www.w2racingchassis.com.br
jeff.automotive@hotmail.com

bracketracer
Posts: 329
Joined: Wed Oct 29, 2008 7:14 pm
Location: New Jersey

Re: 4 Link System - Step by Step

#209 Post by bracketracer » Sun Jun 06, 2010 10:10 am

Sure Jeff that will work just fine....If you do decide to go ahead and do the wishbone wile your installing the 4 link go ahead and weld the tabs on the front between the 4 link brackets that way all you have to do is bolt it in ;) ...

The testing that you will do between the diagonal link and the wishbone will help you see what works better for your combination...

I will tell you that after some shock spring changes and some preload changing my Vega did pick up .05 on the short times and was alot more forgiving when the track was not hooking well...And to be honest I went ahead and did this cause of what Dave M said in his book..Also won 2 6 round bracket races in the same month after I did the wish bone :smt003 :smt003The short times were very constant and only varied .04 all day... :smt003 :smt003

User avatar
Mike Peters
Posts: 930
Joined: Wed Oct 12, 2005 1:48 pm
Location: Wichita, KS

Re: 4 Link System - Step by Step

#210 Post by Mike Peters » Wed Jun 09, 2010 9:20 am

bracketracer wrote: Mike is a smart guy and always like to read his reply's as there is always some good info...
Hey!!! Take that back!!! If you knew all the frustration I create with the questions I ask, you'd wonder how I can figure out how to get to work everyday. I'm not smart but, the info I've passed on is from reading I've done. So, I'm no genius but, merely a messenger passing on the knowledge from others who are. Thanks for the compliment anyway.
"If winning was easy, losers would be doing it"

Post Reply

Who is online

Users browsing this forum: No registered users and 105 guests