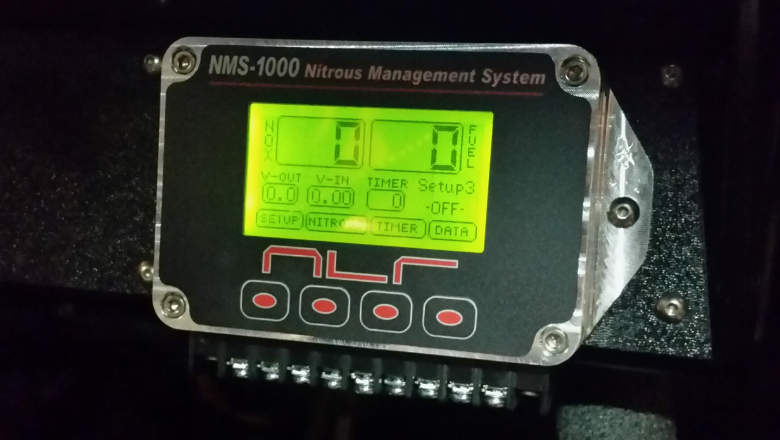
 NMS 1000 Progressive Nitrous Controller
How do Progressive Controllers Work?
Reference: Nitrous Controller, Launch Percentage, Frequency, Hertz, Response Frequency's
Nitrous Oxide Progressive Controller Frequency & Percentage Settings
Virtually all racing N2O progressive controllers systems employ a concept known as Pulse Width Modulation (PWM) to electrically control the flow output of nitrous oxide and fuel solenoids. There are two settings that control the electrical pulses to the solenoids. Pulse Frequency is how often the unit turns the outputs on in cycles per second, this is called the "Hertz" setting. One Hertz (Hz) is to equal one cycle per second, so when we change the Hertz setting, we're adjusting how many times per second the progressive controller fires the solenoid. The faster we fire the solenoid, typically the smoother the nitrous output to the engine.| Hertz | Cycle Length |
|---|---|
| 12Hz | .083s |
| 15Hz | .067s |
| 20Hz | .050s |
| 25Hz | .040s |
| 30Hz | .030s |
| 40Hz | .025s |
| 50Hz | .020s |
Once you have it set, the Hertz does not change when the controller ramps the output up from the start percentage to the end percentage. Hertz remains constant during the units operation (for most nitrous controllers). Here's a chart that shows you the difference in cycle time with the difference Hertz settings. Cycle time consists of the time period from when the output goes on and off, to where the next cycle begins. At 12Hz, we would have 12 pulses on and off, each lasting .083s.
The second setting is Percentage, which is typically adjustable from 0 to 100% in 1% increments. This value is actually what is called Duty Cycle or abbreviated as DC. Duty Cycle (%) is the duration of each of the output pulses which controls how long the solenoid will stay open on each pulse. Think of this like camshaft duration - how long on each engine revolution the valve is held open. 25% Duty Cycle means the output to the solenoid will be on for 25% of each pulse sent to the solenoid.
If you have your nitrous controller set to 20Hz, it will take .05s for each cycle, and if your % is at say 25% start percentage, your controller will hold the solenoid open for approximately .0125 second - that's a pretty short pulse. At 80% Duty Cycle, that pulse will last .0375 seconds.
If you had your controller set to launch at 0% to 100%, this animation will show what the output would look like going to your solenoids.

Duty Cycle % Change
Credit WikiPedia
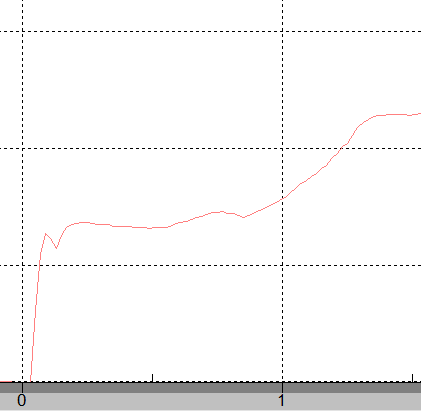
Notice the width of the pulse changes, but the number of pulses per second remains the same. If you were watching the electrical signal going to your solenoids with an oscilloscope when you launch your car, it would look something like this.
Progressive Nitrous Output Vs Hertz Settings
A question racers typically have is what will happen if I change my Hertz setting from say 12Hz to 20Hz, but keep the same launch percentage?
Assuming your solenoids can handle the higher frequency (more on that below), when you increase Hertz, the solenoid fires more times per second, and if you keep the same Duty Cycle, the amount of "ON" time per pulse will be reduced. So we have more pulses per second, but they are of a shorter duration. So let's say you currently have your system set at 12Hz, and you change it to 20Hz, but you keep the same 30% start percentage - what difference will it make at launch?
| Hertz | Duty Cycle | On Pulse Width | Total On Time for .5s |
|---|---|---|---|
| 12Hz | 30% | .025s | .15 |
| 20Hz | 30% | .015s | .15 |
Interesting huh? Your 1st setup with 30% launch at 12Hz will pulse the output 12 times in one second, and the solenoid's will be open for .025s. When you increase the frequency to 20Hz, and keep the same Duty Cycle, it shortens the time each pulse is on to .015s. So say over a 1/2 second of ramp time holding the 30% Duty Cycle, the solenoids will be open the same total time. You'll just have shorter duration pulses, and more of them at the higher frequency.
Let's look at this another way, what happens if we are trying to keep the same pulse width?
| Hertz | Duty Cycle | On Pulse Width | Total On Time for .5s |
|---|---|---|---|
| 12Hz | 30% | .025s | .15 |
| 20Hz | 50% | .025s | .25 |
We have to go up to a 50% setting to equal the same On Pulse width at the higher frequency. This leads us down another rabbit hole, usable pulse width is dependant on what solenoids you're working with. There's always a catch isn't there?
So technically speaking, as long as your solenoids can respond as fast as what you're attempting to pulse them at, changing the frequency has little net effect in output. The average time they are open is the same as long as you maintain the same Duty Cycle (%).
Expected Nitrous Output vs Actual Output
Nitrous Solenoids aren't magical devices, they can only open and close so fast. Depending on many factors such as coil size, amperage, plunger weight, plunger lift, Nitrous pressure, etc. There are limits to how fast you can operate them. Each type of solenoid has a frequency and Duty Cycle range that it will actually function in. When you exceed those parameters, the solenoid will either not open, or go wide open.
Unfortunately, windows of operation ranges are not published for most nitrous solenoids in this industry. In addition, the amount of volume after the solenoid plays a part as well. A solenoid with a long line on it attached to a plate, vs a pair of solenoids hooked to a distribution block and a fogger, are going to have different pressure curves at low percentages even if they have the same solenoids.
Back pressure after solenoid with progressive ramp
Solenoid Response Rates or Window of Operation
Trash Cans (non specific models) start to work around 20%, and reach full open at around 70% at 15 Hertz settings. Back to our calculator, that is a pulse width of .0133s at those settings. Technically they might be able to open at 16% if you drop down to 12 Hertz, that is the same pulse width. If we go up in Hertz, let's say 20Hz, 27% Duty Cycle will generate an equivalent pulse width. Hopefully these correlations will make sense as to how Frequency and Duty Cycle affect where large solenoids can operate at. Fuel solenoids respond much better than nitrous, so realize that if you attempt to use a 20% launch Duty Cycle, it's possible your fuel solenoids will be pulsing but your nitrous may not be at that point.
On the other end of the spectrum, if we're at 15Hz, and the solenoid quits pulsing at 70% and goes full open, the on pulse width is .0467s but the off pulse width is only .020s, which is really short amount of time. Increasing the frequency at the same percentage to 20Hz shortens our off pulse time to .015s, so whichever way you slice it, it starts getting difficult to achieve total control over these solenoids.
In general, the higher the frequency (Hertz) the narrower the working range of Duty Cycle you can control with the solenoids. However the higher frequency also tends to deliver a smoother output when it does work repeatedly.
Percentage (Duty Cycle) & Hertz Settings Do NOT Equal Flow Rate
If our solenoids won't open until we reach 20% Duty Cycle and go full open at 65 to 70%, that means our progressive controller settings are not linear to the solenoid output by no means. Monte Smith from NOS has stated that in his tests, with some Trashcans and .036 jets, at 20% Duty Cycle he was flowing 32% of total system flow. At 50% Duty Cycle, he recorded 70% of total flow rate, and at 70% Duty Cycle the solenoids went full open and moved the same flow as 100% Duty Cycle. Some Trashcans don't respond as well, you might actually see 65% of your total flow rate at only 20% Duty Cycle with some solenoids.
In order to work around these issues, we have to set our controllers for a Start Percentage (Duty Cycle) based on where they actually work at, such as 25%. Then use Timing Retard to kill any additional power, instead of dropping down to a start percentage where the solenoids won't work at. We need to realize that when we reach approximately 70% we are likely close to full flowing with many larger solenoids.
To further confuse the issue, Hertz settings also can play a large part in commanded output vs. actual output. A large solenoid with large coil does not typically have the ability to pulse as quickly as a small one. When we command a Trash Can to pulse at 20hz for example, it can possibly do that reasonably well within a range of say 30-80% duty cycle. However due to coil saturation, it can take longer to open and close than a smaller coil, effectively generating an output pulse that is wider than we are asking for as compared to the same duty cycle at say 18hz. It's not so much what we tell the solenoid to do, it's what it ends up doing, that is the end effect we have to work around. That's why having good data logging of back pressure at the distribution block is very helpful to see the results of your changes.
Build Time & Ramp Rates
When you first start working with progressive controllers, you'll hear terms thrown around such as linear ramp, dual ramp, and non-linear ramps. This might be a bit confusing to understand what people are talking about, it can help to visualize the differences.
Linear Ramp
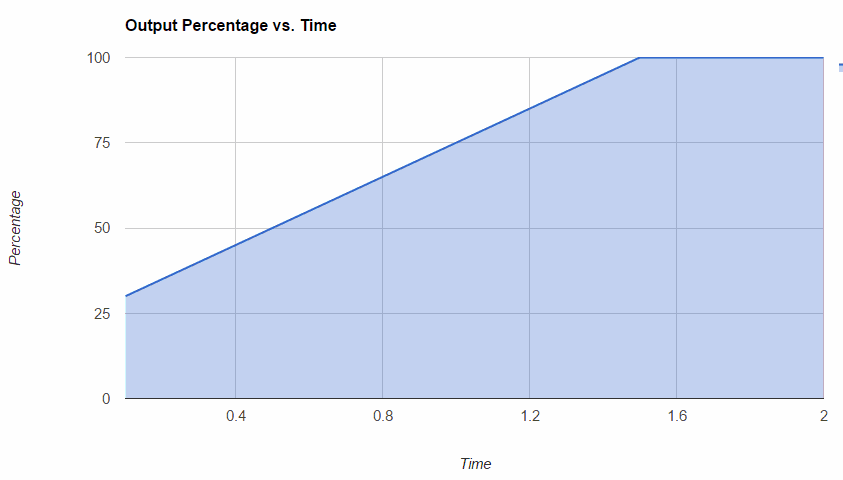
Linear Ramp Example
This is a linear ramp, the most simple to setup and common for less advanced controllers. It starts at 30% and ramps both nitrous and fuel solenoids to 100% in 1.5 seconds. Remember that even though you are commanding your solenoids to function at these percentages, it doesn't necessarily mean they will respond as you tell them. It's very common for the nitrous solenoid to go full open in the 70% range, but the fuel solenoids continue to progress.
Dual Ramp
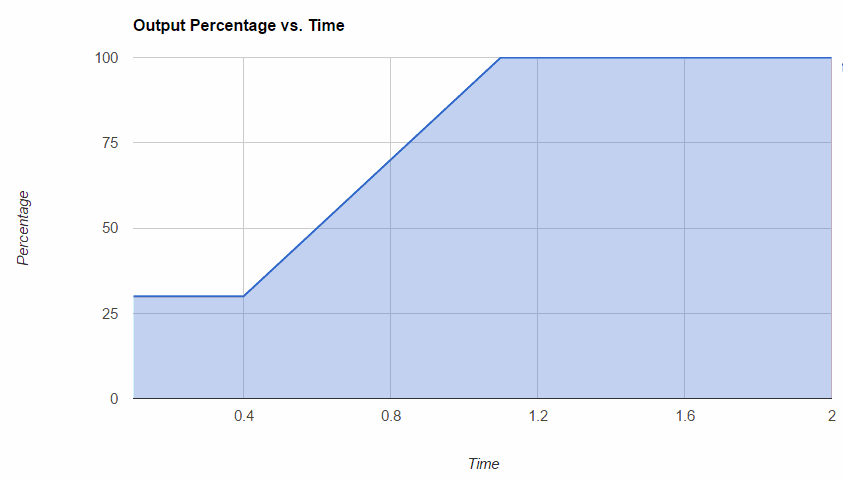
Dual Ramp Example
This is a Dual ramp, an improved capability that controllers like the Edelbrock and Leash controllers can put out (The Leash actually has a triple ramp capability).
In this example, we start at 30%, hold that percentage for .5 seconds, then ramp to 100% in about 1.1 seconds with a linear ramp. This is a very common setup to let the tire get set before throwing the power at the car.
Non-Linear Ramp
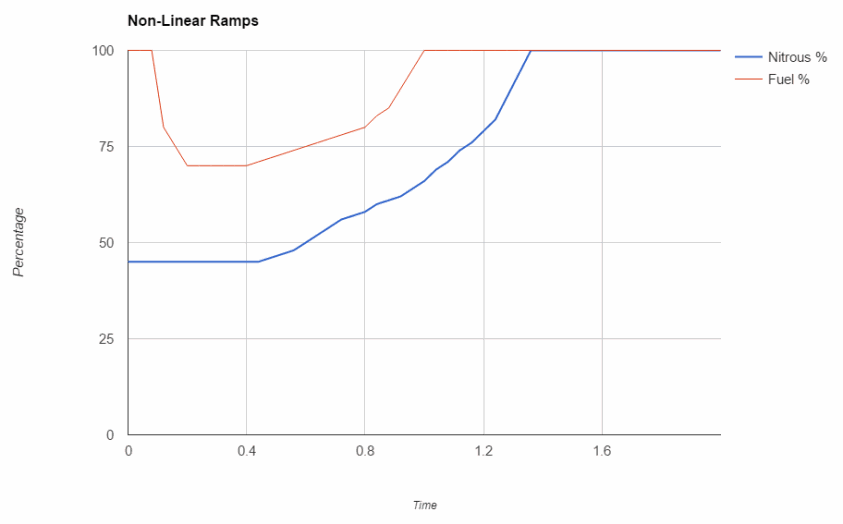
Non-Linear Ramp Example
This is an example of a NMS-1000 controller setup which is capable of separate fuel and nitrous ramps, and is adjustable all the way down to each output pulse offering very fine control and non-linear output.
The reason non-linear is helpful is we can more closely match the actual solenoid capability, and make very fine adjustments where we want to add or take away power. Not to mention the control over fuel, like this example where we are hitting the fuel solenoids at 100% for the 1st three cycles to try and get the fuel moving covering a lean spot. Then we drop it down to less output, more closely matching the nitrous percentage output.
In this example, we start at 40%, hold that percentage for .5 seconds, then ramp to 100% in about 1.3 seconds with this non-linear ramp.